How to replace a thermal fuse

Thermal fuses are the source of many non-working electrical devices. As I have written in my previous article, they are used in varied devices such as hair dryers, blenders or ovens. Everything that produces heat or can produce heat when abused usually contains one of these fuses. If such a device no longer works, chances are high, that a thermal fuse is faulty.
In principle it is easy to replace such a fuse but there are some things to consider when doing so.
Opening the device
Most thermal fuses cannot be accessed from the outside of the device. When you open the device, make sure, that it is disconnected. Never open a device that is connected to mains power (unless you know what you are doing). Mains power can seriously harm and even kill you!
If I work on such a device, I often put a piece of (red) tape around the plug. That way I can always see where it is on my bench. Before I open the case for a modification, I always check that the plug with the red tape is disconnected. Even with a simple repair such as replacing a thermal fuse I often open and close a device multiple times before I’m done.
And as always, don’t forget to take pictures from everything you remove and some overview pictures. That way you will always know how to reassemble your device.
Finding the thermal fuse
The thermal fuse is always installed in close proximity to the “thing” that could overheat. They can be attached to the windings of a motor or be located close to the heating element of an oven. They are wired in series with the load that can overheat. This means, that the wire that powers the thing contains the thermal fuse.
The fuse can use one of several different packages. The most common one you can see in the picture above. You can see some others when searching for them. The marking on the element usually indicates a temperature, a voltage and a current.
Check it is the thermal fuse
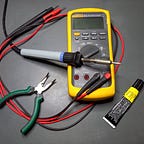
To verify that the problem really stems from a tripped thermal fuse, you have to measure the resistance of the fuse with a multimeter. If it measures a resistance significantly below 1 Ohm it is still good, if it measures open (OL on most multimeters) it has tripped and needs to be replaced.
Correct rating
The rating of the fuse you want to replace is written on it. Try to get a fuse with the same temperature rating as the one in your device. If you can’t find one, try to get one which is as close as possible. Some single degrees off won’t hurt but not 10 or more.
Make sure the fuse is rated for the correct voltage (e.g. 230V) and at least the same current (e.g. 10A).
Removing the old fuse
Thermal fuses are usually crimped. This means, that they are connected to the wires with a small piece of metal which is deformed to tightly grip the lead of the fuse and the cable.
Sometimes it is possible to undo the crimp with a pair of pliers. Just press in the direction the metal piece will go back to its original round form. If the crimp has been done properly, this won’t work. Then you have to cut off the fuse with a wire cutter. Before cutting it, examine the cable leading to the thermal fuse. If it is long enough, you can cut it, strip the isolation, and reattach the thermal fuse. If you do not have enough cable, you can consider cutting the lead of the fuse instead and crimp the new fuse to the lead of the old one.
How to attach

Most thermal fuses I have encountered were attached by crimping. This method has many advantages. All you need is a pair of crimping pliers (such as this one from knipex). Often you can buy the thermal fuse together with the barrel used for crimping.
Put the cable and the lead of the fuse into the barrel and press it shut with the pliers. After the crimping, pull on the fuse to see that it holds. It should withstand several kilograms of pull.
A word on soldering thermal fuses. This, while in theory possible, is not advised. When soldering you have a significant risk of tripping the fuse and destroying it that way. If you succeed, you still have the problem, that solder melts at around 170C which can be close or ever lower than the temperature of the fuse.
Close up everything
Once done, put everything back in place. Put back all screws and attach cables with cable ties where you had to cut them. See to it, that the thermal fuse is in the same position as it was before. This is important for the temperature to properly “reach” the fuse.
Test your device if it works again.
Conclusion
Replacing a thermal fuse is not difficult. The tools required are not very expensive and hard to use. The most important thing is, that the crimping holds well.
If you have any questions or additions, just write a comment!